McFarlane Primaris Marines
- Matt
- Dec 23, 2020
- 10 min read
Updated: Oct 25, 2021
Games Workshop has been pretty open to the idea of partnering up with other companies recently and offering an expanded range of merchandise. I think one of the first was the set of Funkopop figures, but last month saw the release of two 7" Primaris Marines from McFarlane toys.
One grey Marine with Bolt Rifle and one blue Ultramarine with Chainsword and pistol. Unfortunately for anyone not a scalping bot, these figures sold out pretty quickly. Original price was £25 but currently sell for £50-60 on ebay...
Luckily, one of my pass times seems to be using ebay + ending soonest as a slot machine. Scrolling through everything with the keyword Warhammer. Most evenings result with a total loss of time and a rather sore scrolling finger. However it seems to be the best way to find bargains on ebay, as I managed to find a grey Marine disassembled and priced at a point that meant I still have both my kidneys.

I aim to convert this figure to be a member of the Chevaliers. For those not familiar with my homebrew chapter, you can read up about them here.
The Helmet

All of my traditional scale Primaris Marines have the front helmet of a Bretonnian and the rear helmet of a Marine. Complete with medieval helmet mascot.
I'm aiming more towards a blade guard helmet in this larger scale. Trying to replicate what their armour would be, rather than the simplified 28mm versions.
I began converting the helmet by shaping Milliput to the front section. Once this was cured, I also cut and filed it down until I was happy with the overall shape.
Then with a mechanical pencil, I sketched a Fleur-de-lis on one side and cut that shape into the Milliput with an engraving machine. Some of the older Bretonnian helmets have these elaborate breathing holes and while I don't for one minute believe Space Marines need a hole in their helmet for air, it's just another layer of detail.


As for the mascot, I did take a trip to a local toy shop but didn't find anything suitable. So it was straight to the bits box when I got home. I settled on a Bretonnian Pegasus head which is a decent fit. I am trying to copy one of my 28mm figures in particular here but will need a pair of wings...
So far it's just been positioned upwards to leave room for a small shield. I've also added some Milliput to the brow. The front section protruded a little too much and needed the top half to match somewhat.


Green stuff was added to the eyes as I felt the lenses were too far recessed into the helm with the extra milliput work. As for the Pegasus, wings from the Blood Angel Sanguinary guard set were pinned into the side and neatened up with Green stuff.
Lastly, a Green stuff Orle was added to the top of the helmet. Two lines of green stuff were rolled out then twisted together, then slightly rolled again. The hard part was "tying the knot" at the back. I think I've done a passable job but will be clearer once painted. A small shield (well a normal sized 28mm one) was then added to the front. I'm aiming to paint this McFarlane Marine like the mini one here;


The Left Shoulder Guard
All members of the Chevaliers bear the chapters Fleur-de-lis on their left shoulder guard. Painted with the chapters intended colours of half red and half blue.
I started with a Milliput centre which was sanded down once cured. I've sculpted loads of these shoulder guards for the 28mm figures, so on the larger one I want to add that extra level of detail. Firstly buy leaving a section for a gem in the lower half.

Once this was done, I used Green Stuff to add two sickle shapes either side. These were done separately and I left the piece alone for several hours between each one, as to not accidentally ruin one while I worked on the other.
The middle tie was Milliput again, this time adding the word Virtue in my best medieval font. This section will need a tiny bit of filling down before I move onto the next step.

Lastly, to finish the chapter emblem, green stuff was added to the centre band and gem.

The Right Shoulder Guard
If I didn't think I'd make a mess of it, the right shoulder guard on the 28mm figures was meant to be embossed with the warriors heraldry. I didn't fancy sculpting tiny rampant lions onto 28mm shoulder pads, and I don't fancy doing it on the larger version either.
However instant mould allowed me to copy one side of the Bretonnian Pegasus head straight onto the larger piece. While the Green Stuff was soft, I changed the lower end and neatened a couple of areas up with my sculpting tools.
Unfortunately it's a little off centre. Hopefully once it cures, I can peal it off and reposition it.

A purity seal was also added to this side, along with some filigree on all four corners of these oversized shoulder pads. The plain trimming is fine for a 28mm model, but at this scale the absence of detail was something I wanted to address.
Small brass leaves were glued on and slightly pressed into the green stuff before it cured.


The Waist
All of my smaller marines have small Bretonnian shields in place of their right Fauld. On this larger scale, I first cut a suitable shield shape out of ice cream tub plastic and super glued it to the underside of the part in question. Millitput was then added over top and will need to be sanded smooth once cured.


To finish this off and to replicate the much smaller version, a green stuff Fleur-de-lis was added to the top right corner.

The Legs
Not much changed here, but a couple of purity seals and a crusader seal were added.

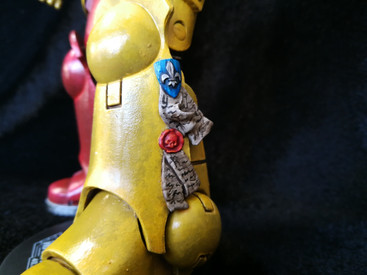
The Holy Hand Grenade of Antioch

"Once the number three, being the third number, be reached, then lobbest thou thy Holy Hand Grenade of Antioch towards thy foe, who, being naughty in My sight, shall snuff it."

Back when the Black Templars got their plastic upgrade sprues, around 2006 I think, they had a little Easter egg in the form of a holy hand grenade.
In fact one of them is carried by my 28mm Captain. It's a little hard to see in the photos of my Captain model, however I've found a pretty clear image of one here -->
For the larger version, I started with rolling a ball out of Milliput and sticking two Empire shield icons together. Well a small amount of Milliput was pressed in between these two icons and all three pieces glued together once cured.


I then set about creating the band that runs around the centre of the grenade. A 2mm strip of plastic was cut out of an ice cream tub and sanded down a little.
Starting with a small amount of super glue at the top, one end of the strip was stuck down and carefully wrapped round. Before sticking the other end down, make a small notch in the plastic with a hobby knife and cut it to size. Lastly the end of a WFB spear was cut off and stuck to the top.
As for the cross shaped grenade pin, Milliput was pressed into all the gaps and left to cure. This will need to be cut back with a sharp hobby knife before attaching it to the top of the sphere.


A green stuff skull was pressed onto the grenade too with an instant mould.
I had contemplated sticking this grenade to the marines belt, however I thought about possibly posing him throwing it too. In the end a small 2mm magnet was inserted to the back of the grenade, and the opposite embedded into the rear armour and into one of the left fingers.
I've used a bit of putty since this image was taken to conceal the magnets a little further.

Extra banding was added with Green stuff to the front and back, with the cross shaped pin, pinned into the top.


So, he's now ready for paint. It doesn't look like I've changed much but then again, it's only really a head swap conversion for the smaller scale.
I've also seen a new painting technique I want to try out. It will require priming the sections of the model with different spray paints and pre painting the shading before adding the right colours.
We'll see how that goes.

27th of December 2020
Painting time.
I knew I wanted to copy the colour scheme of a 28mm figure for this first McFarlane Marine, the quaterized red and yellow one which also has a Pegasus mascot. However I had just planned on scaling up the paint style I have been using on the table top figures. That was the case before I spotted what 4 time Golden Demon winner Danny Nuttall had done on his 7" Marine.
Danny had pre shaded the model before applying the final colours. I reached out to Danny to get some pointers on whether he'd use the same technique for reds and yellows and decided to give it a go after he responded.
Firstly, the model would need to be primed in two different colours. The black undercoat was applied first, then once dry the lighter areas masked off and sprayed with a grey primer.


Next up was the base layer for the yellow areas (currently grey). These were all painted with Barbarian Leather (Snakebite leather) which can be purchased from Coat D'arms here. This is the company who produced the original Citadel colours when I was a kid.
Once that had been dene, the black areas were tidied up to correct some grey overspray as well as painting the under armour black on the yellow/brown parts.

Then came the pre shading. The overall technique is to use a stippling brush to work a gradient into each part of the armour. As if the light is catching it, or parts are in shadow. This also works for armour which is meant to be shiny and therefore reflecting its surroundings.
For the black parts I started with a medium brush and stippled a mid grey/black mix. the area covered here was quite large as each subsequent layer would get thinner. After that I used a slightly smaller brush and used the mid grey directly from the pot. Followed by a light grey and finally a white with a smaller brush.
During the light grey and white stages, I edge highlighted parts of the armour too.
For the brown/yellow parts, it was largely the same technique. This time the first layer was a mix of Steel Legion Drab and Screaming Skull. Followed by a slightly watered down layer of Screaming Skull. The third layer was neat Screaming Skull and finally the white too.
Again its worth noting the final two layers also involved edge highlighting. As for each stippled layer, remember to make them thinner each time (I don't mean paint consistency).


The next stage will be applying the correct colours to each of these armour panels, which I hope to start tonight.
28th of December 2020
The yellow.
Yellow is a hard colour to get right, so I was apprehensive this new technique would work. However now that it's done, I'm pretty happy with it. It's shaded better than the yellow armour on the smaller figures, however I'm not 100% certain it worked. Hopefully when the red is done it will look better.
The process this time was to layer lots of very thin coats over the pre-shading already in place. Each layer is 1 part paint and 6 parts water, so it's a very thin mixture in the end. It's important to still use the mixture as if it was a paint, and not a wash. If you use too much it will just run and pool in places you don't want it to. Apply thin layers at a time and brush away any large amounts of it collecting at the bottom of a panel.
The first 3 layers were a mixture made from Averland Sunset. This was followed by two layers made from Yriel Yellow. Finally a layer of gloss varnish was applied. This was to add to the shine of the armour, as well as slightly bring out the colour. The added bonus is to seal the paint and help prevent paint chips further down the line.


You can also see i've started the blue on the chapter icon shoulder pad, but more on that layer.
30th of December 2020
The red (and blue).
By and large the red was much easier, more than likely due to it looking better earlier on in the process and by the time it was finished too.
The red was largely the same technique, obviously over the black sections this time. The first two watered down layers were Khorne Red. However it was 1 part paint and 7 parts water as the pigment must be heavier compared to the yellow's Averland Sunset stage.
The 3rd layer was a mid range red. I wish I could tell you what it's called but I can't, on account of the pot not having a label on it. However it was a paint from a starter set a few years back. Finally there were two layers of watered down Evil Sunz Scarlet. The last three layers were approximately 1 part paint and 6 parts water like all the yellows previously.
What did I learn?
I would advise anyone doing this not to apply these watered down paints directly over the spray painted basecoat. While layering the reds they would constantly separate over the black areas, no doubt due to how smooth the spray dries. I did not have this issue with the yellow half as I painted over the grey primer with a brown basecoat. Taking into account how much of a pain this will be, in the future I will paint black over the black spray paint to help with the layering effect later on.
Lastly the red also got a gloss varnish to bring out the colour and help with handling the model.
As for the blue, I'll expand and play with the layers on the next 7" marine (yes I have the Intercessor Sergeant too). However for the half shoulder pad on this model, it was 3 layers of Vallejo game colour Magic Blue, and 1 final layer of Regal Blue just to darken it all down. Each layer was also painted over a black base and watered down to a 1/6 ratio.


07th of January 2021

It is done.
Seems like a monumental task has been completed if I'm honest. With that said I am happy with the finished outcome. Not sure if I'm looking forward to the next one however. Bitz for the head mascot will hold me up so I've got a bit of time to focus on other minis.
So without further adieu, here's Brother Maynard.


Maybe now the Primaris Marines know what the Firstborn Marines feel like;


What did I learn?
Piecing this guy back together was a pain, this was compiled by the fact the model is painted once you're ready to rebuild. The hip join especially was an issue, in the end I filed parts of the joint down to fit it back together.
Vaseline was used to grease the joints and I took my rings off during the task. In the end there were a couple of scratch's but nothing major and nothing I couldn't put right.
As for the next marine, I'm not taking the hips apart.