The Green Space Marine
- Matt

- Feb 21, 2021
- 9 min read
Updated: May 24, 2021
So I had originally planned to include the construction of this model within the Chevaliers blog (linked here), after all he will be the armies centre piece. However keeping the converting work on a separate page would allow me to be more granular with the details, without making the main blog too lengthy

As per my homebrew Chapters background, the Chaplains take the Forest Vow and are the only knights permitted to wear green armour. I had already converted a "Green Knight" on foot but always planned on adding one riding a motorbike to lead the Outriders the army will rely heavily on.
I wanted the mounted figure to be a closer match to the old Fantasy model than what my first conversion turned out like. As if the biker could actually be the fabled Green Knight and not simply a marine who's following in his footsteps (or tyre marks).
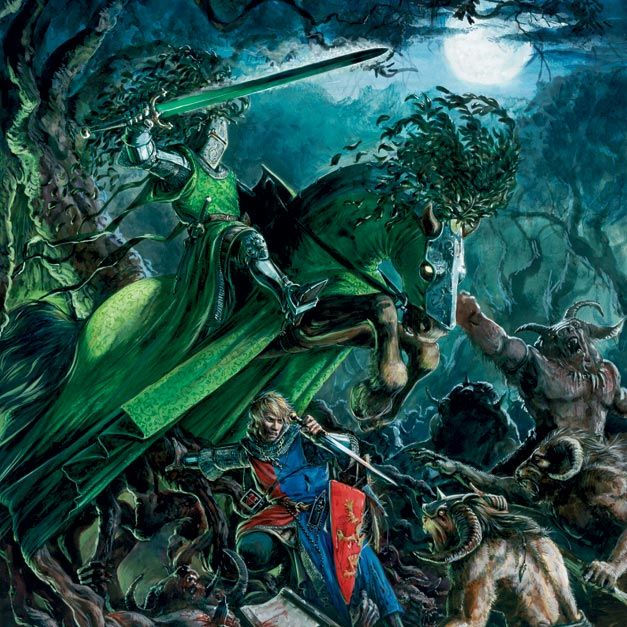
My first idea was to have the bike leaping over or out of a tree. After checking the old Bretannian army book for inspiration, I decided to try and replicate the artwork within the book (and at the top of this blog) as closely as I could, just with a 40k twist.
I ordered some 40k Beastmen from the Blackstone Fortress set and started raiding my bits box for other parts to use for the poor old Guardsman in fear of his life.

But before the conversion work begun, I had to sort a base out for them. I couldn't simply use the Outriders 90mm base as it's too small for what I wanted to achieve. I looked at a 120mm oval base but still wouldn't be long enough. In the end I ordered two 150x95x2mm oval bases laser cut from MDF. However If I stuck all the figures to this base, the mounted Chaplain wouldn't be able to be used in a game. Making things easy for myself, I cut holes out of one of the large ovals so that the individual models can be removed from their diorama.

This wasn't as difficult as I first feared. Once the smaller bases were marked to one piece of MDF, I used a heavy duty hobby knife and cut around the inside of these pencil lines. It did take several passes for me to cut all the way through however. Once the holes were cut, I used a rounded file to shape them to an exact fit.

Once I was happy with the fit, the two halves were sandwiched together with PVA and held in place with some G clamps.


As for the Space Marine, I had one Outrider spare from the last set of three I bought. Annoyingly the model I had spare, had his right hand on the handlebars. Because I set my self the goal of copying the artwork as closely as I could, his right hand needed a sword.
The replacement arms came from the newly purchased Bladeguard set, and with some careful pinning, the hilt of a sword became the left and right handlebars. A suitable outstretched arm also came in handy to replicate the pose needed.

As for the helmet, It started like all the other converted heads for the army. One half Bretonnian helmet, back half Space Marine head. For the plumage, I used the tail from an old Empire mechanical steed. I was loathed to cut this off an OOP model, but knew I planned on using this steed for my Ad Mech army, which the leafy tail wouldn't suit.
Lots more green stuff work is needed but it's already taking shape.

Next up is the fearful Guardsman. This will end up being the prototype model for a Guard army converted to fight alongside the Chevaliers, so I already had a picture in my mind of what his uniform would look like. Mixing modern Cadian parts with feudal clothing, the mortal armies of Brettoncourt IV would appear a little haphazard.
The main challenge here would be copying the somewhat crouched stance the knight in the original picture was in. With his right leg up on a tree root, left leg outstretched and arm up wielding the last of his weapons. In this case a standard issue combat knife.
A pair of running Cadian legs was cut down and rounded off until I was left with two boots, to upper legs and the hip section. These were then joined together via a paperclip skeleton to hold the correct position ready for the greenstuff. The legs used are cast in resin, I wanted a back up in case I royally fecked this up.

The arm was constructed from the arm of a plastic Middenheimer with the hand from a Cadian grenade launcher. I picked an unarmoured torso so that the final red and blue overcoat would be more apparent.

I also converted a las-lock rifle for him. Although no discarded weapons are seen in the original artwork, I wanted something on the base which might highlight he wasn't sent into battle armed with just a knife.

Lastly for the first update, a dead Beastman. In the artwork, there is one impaled Beastman in the foreground laying on his back. In this version I'll greenstuff some knife wounds, as if the Guardsman desperately fought off one of these beasts before more of them charged his way.

Lots of greenstuff work to go and I haven't even started the tree sculpt!
25th of February 2021

Mid week update today. Lots of sculpting started with some bits finished like the knights helmet and shield for the bike.
I've actually cut the helmet down since the photo of it in the first section of the blog. It was just a little too long, so I cut away more of the Bretonnian half of the piece.
Although the artwork I'm working from doesn't depict a green knight with orle, I decided to add one anyway. The helmet looked a little weird without it.
As for the shield, I annoyingly had a metal green knight shield that was stuck to the Chaplain on foot. If I planned my builds, I might have saved the official part for this model. Nevertheless my green stuffed version will probably look OK once painted. It's mainly just leaves anyway.

The Imperial Guardsman has also improved, although I did cut a little more away from the right leg as it looked to long. Hard to tell the proportions when its just a wire frame.
His head was also finished off with some flowing hair, caught in the wind of an outrider flying overhead.
Lastly for the sculpting work so far was the dead beastman. Joining the parts up mainly and adding the wounds inflicted by the guardsman.

The tree has also been started. A rather difficult job of plotting where the roots needed to be for the guardsman to lean against. As well as having them all stay in place before the milliput work can begin. The framework is 2mm copper wire and some types of copper wire are easy to bend. This particular order of copper wire wasn't...
For the sculpting work I'll start with the inner most roots first, working outwards once cured. At some point in the trees construction I'll have to make a hole for the peg on the outrider's back tire.

It is all starting to take shape however, with the tree being the next main focus.


1st of March 2021
Over the weekend I've made pretty decent progress on the tree. The main roots are finished but I'll still need to add in smaller roots branching off the bottoms, as well as start the tree trunk. I've been searching high and low for one of Games Workshop's Wyldwood trees but so far no such luck. These types of plastic trees from GW date back to when I worked for the company some 15 years ago (the tree's with those flat canopies), I don't know why a single one floating about in an ebay listing isn't popping up. The search continues as I very much want to use one for the top of this tree.


I also spent a little time thinking how to make the Green Knights bike stand out. I ended up using some brass leaves from an old terrain set to add that bit of detail to the side panels. I wouldn't say I'm done yet with these pieces, but we'll see.
The custom forest sprite shield has also be glued to the top half of one of these pieces (it still needs to come apart at this stage to fit round the bike once painted).


These same leaves, well from the same brass sprue, have been glued to the head dress of the knights helmet. In the artwork it looks like he has an infinite source of leaves flowing from his head. Hopefully sticking a couple different sizes of leaves to the existing part will have that effect once painted.
Lastly for this update, the Guardsman is almost finished. Once that last tree root was in place, I started work on his right arm. However I still need to add the loose sleeve over the top section of the arm
and his hand will end up being sculpted to the root itself.


6th of March 2021

So I'm almost at the end of what I can do with this model currently. Finding a suitable tree top is proving to be a pain.
As for what's been completed this week, the shoulder guards were the first. The Fluer-de-lis was sculpted to have a more leafy feel to the middle and the right guard has the same forest sprite embossed as the shield.
The guardsman has also been finished, with similar trinkets to the artwork hanging from his neck and waist. The right hand is attached to the tree root and not the guy at the moment. It will allow me to paint him independently and glue him in place once done.


As for the base of the tree, it's all done. A shaped hole has been placed into the root ball too, so the bike can be held in place. Despite the photos below, the bike is not glued in yet. Like everything I'm working on recently, it will be painted in pieces and glued together at the end.

As for the current state of the diorama, here's a few images from different angles.


Pretty happy with it all so far and best of all, the biker comes out to be used in game;

Just need that tree top now...
20th of March 2021
I've finally found the GW tree tops I was after, the branches to go with these would have made my job that little bit easier but I've tracked down the important parts.
The sprue dates back to 2007 so I'm surprised it took so much time on ebay to find them.

With these leaves, work could begin with the rest of the tree. The copper wire I purchased for the roots was used again just this time for the branches. An end of the wire was curled to a loop and fastened to the exposed bottom wires before a bit of milliput was pressed round it to strengthen the join.


4th of April 2021
The beginning of the week saw more work on the main branches with lengths of paper clips being pinned in place once the main ones were finished. I also rolled out some very small branches to stick to the underside of the plastic leaf canopies.


I also made a few changes to the Green Knight. The front of the bike and his armour looked too plain so more brass leaves were added with a little bit of green stuff to neaten it up.
All in all, the build is finished. Really looking forward to painting this now.


16th of May 2021
Been a while since the last update and I've made significant progress painting this model. The figures and bike all had a grey undercoat as per most of my models nowadays, but the tree was base coated black. Thought it would be easier to hide parts of the roots I couldn't paint if it was darker.
The Green knights armour was the first thing I finished, with most of the fine detail done too as I type this.
At the time of this entry I don't have a YouTube video on this green technique, on account of it being the second time I've painted green armour like this. However if you follow the blue video with green paints you won't go far wrong.


As for the guardsman, well he's finished. He just needs to be glued in place to reattach his hand once everything else is. This particular figure has really given me the bug to build a whole squad of guardsmen like this now.


Last up is the tree. Pretty happy how this is coming along and once I stick some dead leaves to the base and add some moss, it should be just as I imagined it to begin with.


Well that's all for now. Hopefully over the next few days I'll finish the Beastmen too.
22nd of May 2021
It is done!
And I can't quite believe it. It was months ago I first formed the idea of doing a proper Green Knight and now it's done. Not much else to say so here is a load of pictures and a video of it at all angles.


If you would like to vote for this mini on Coolminiornot, here's the link.
Thanks for following this and getting to the end. Next up, The Black Knight!


Comments