The Table Top
- Matt

- Aug 29, 2022
- 5 min read
Updated: Aug 13, 2023
Ever since I was a kid, well aged 14 when the 2001 City Fight Codex came out I was determined to one day build a proper table top. One to rival those I saw in the book, ruined buildings and all.
I think that city battlefields have far more character than your standard forest/desert and opens up a lot more options than a few trees kicking about.
Time, space and or money was always the issue but recently the trifecta has happened and it dawned on me, I could at the grand old age of 35 get this started. (I even paint striped my old classic Cadians in preparation too).
Technically I started this project a good few years ago with the construction of a multi-storey building with removable floors. Even back then I knew roughly what I was aiming for. Each piece of terrain would be mounted on a 4x8", 8x8", 12x8" etc base plate and all the roads will be raised above the base of the table top to the same height as the terrain. This will allow for a modular approach to the battlefield and keeps the ground level. No more pieces of terrain placed on the table that due to their base board, sits 5mm above everything else.
So this building is on a 12x8" base and technically occupies 1.5 sections of available real estate space.


You can also see 1 of 3 two by four foot plyboard sheets with the roads carefully drawn on. As a standard terrain piece for this battlefield will be 8x8", you could fit 3 pieces of terrain across the short section of the board and 6 along the longer side. Or with all 3 plyboard sheets, 9x6 spaces for terrain.
The roads however will also occupy sections of the board. Whereas the terrain is 8x8 inches, the roads are not as wide. I've deliberately done this to allow for that extra room when placing multiple bits of terrain down to fill the non-road voids. Would be nothing worse than for the sake of a millimetre, a piece of terrain doesn't fit in the gap.
Below is my current plan. With the 3 boards planned out (A, B and C).
Each small square represents a square inch of the board.
The blue and white spaces are standard gaps for terrain. So from now on when talking about terrain and how much space it will occupy, 1 unit of terrain is 8x8 inches. 1.5 units of terrain is 12x8 inches and so on.
The lightest grey areas are road sections. Mid grey square are pavement and the darkest grey 2x6" spaces are the removable road sections that will allow for road blocks etc.
The red section running the length of board B will be railway track. Thought it would mix things up a bit and one day gives me a reason to build the heresy train!

Over the last few days I've been working on board C and the first thing to do was cut the road sections out and stick them to the plyboard.

I used a few G-clamps to hold the edges down while heavy items kept the middle sections down while the PVA dried.
When that was done I textured the road with sheets of coarse sand paper. Once painted it will look like a level and consistent road surface.

I ended up painting on filler over the joins in the sand paper. Not sure about the rest of the world but in the UK when road surfaces are repaired, tar is set over the edges of the new road to (I guess) seal it to the existing blacktop. With this in mind I also painted the filler over some areas of the road to make it look like potholes have been repaired in the past.
However the road was still looking pretty new at this point so used the Dremel to hollow out some blast marks in it. PVA was poured in and painted outwards in a star shape before sand was sprinkled over, to hopefully make it look like explosions have hit the road.


The one other road detail so far is a manhole cover. I raided the bits box to create something suitably 40Kish and then made an instant mold of this. I assume this feature is going to appear on the other boards too.


It's raised above the road a little more than I would have liked but it works.
As for the pavement, well this was created with many 2x2cm cut-outs from cereal boxes. Match sticks then made up the kerbstones and milliput used for the corners.

As for the removable sections of the road, I've created 4 so far. Couple of tank traps, rubble and open carriageway to provide options.

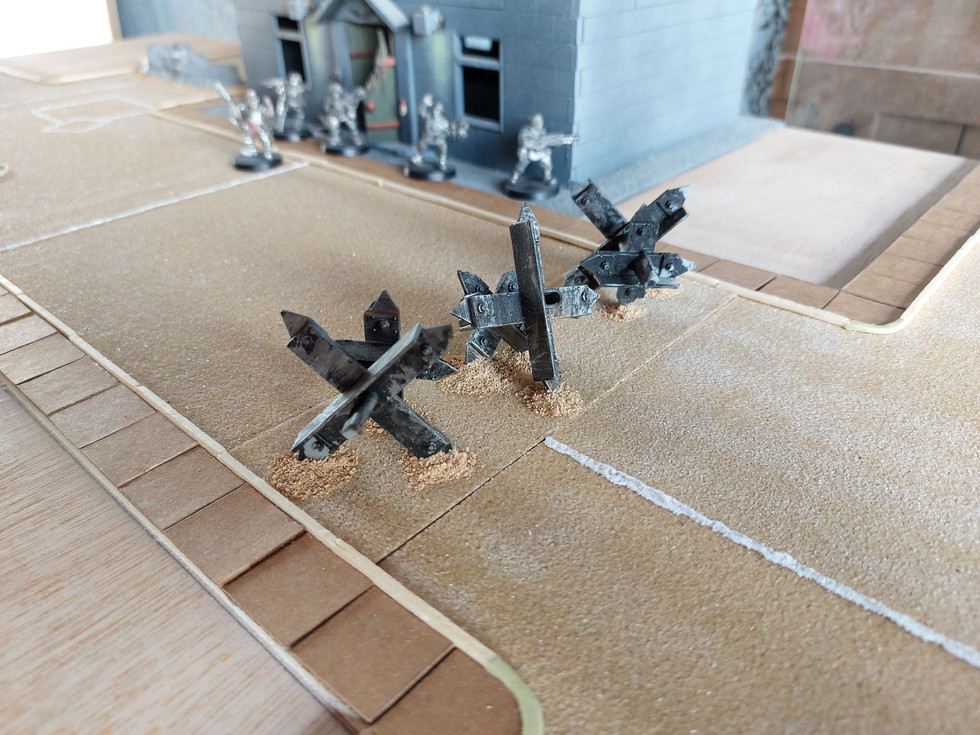


The little traffic cones where made with the same process as the manhole cover. Milliput pressed into an instant mold. This was mainly for that open road section, as I needed something on it so I can pick it out of the recess.
So best part of my week off work spent on a single board but I'm happy with the progress so far. Honestly the roads won't be the difficult part. Creating enough terrain sections to fill the battlefield, that's the longer project.

13th of August, 2023
It's been a while, a year almost since starting this blog, but I'm pleased to say the 3 boards that form my 4x6 table are now finished. All I need to do it build a city's worth of ruined buildings...
After finishing the first board in the original entry above, the Autumn set in and I chickened out of spending any real time in the garage. But with the arrival of Spring 2023 I got to work again.
The construction of the 2 other boards didn't alter much from the first. However I did discover Scenic Cement when looking at gluing the stones around the train tracks of the centre board. Makes things far easier than trying to use PVA and tapping the excess back into the pot!

Once the roads were completed, I also set about adding litter as the streets looked too clean. I happened to be painting a Boomdakka Snazwagon at the time and the footwell of that model comes complete with bent tin cans and discarded bottles. A quick instant-mold meant I could churn out green stuff copies to hide in amongst sand and slate chippings.

As for the paint, I covered it in cheap black interior paint then from a longer distance than you would usually hold a spray paint, covered it in two shades of grey.

Once a second coat of black was added back on top of the overspray, it was ready for road markings and fine detail.

I took UK road markings as a guide and in some places made little stencils for myself. The lines on the road was all painted freehand, resting a ruler in place to keep them straight. This took several days. Not going to lie...


I still need to paint the 4 road insert sections I've built so far, the ones with the barricades and tank traps, but I'm very happy with this part of the battlefield finally being ticked off.


Comments