Lego exhibiting
- Matt

- Jan 14, 2024
- 12 min read
Updated: Aug 15, 2025
Index
Where it all began
In the beginning I started collecting Ice Planet sets as a way of reliving my youth and hitting that nostalgia drug. I hadn't ever considered exhibiting the collection until September 23, in which I took the family to a local Lego show in town.
It was mainly traders selling Lego for prices any collector knew to avoid. However there was a guy there displaying his late 70s to 80s Space sets;

(not an image of my collection)
We got talking, mainly to do with the fact I was wearing an Ice Planet t-shirt (I dressed accordingly for the event) and discussed how the IP range wasn't as expansive as the Classic Space theme so I had started to recolour sets in the IP white, blue and trans neon orange.
Once home and the during the following weeks I started to consider how I would display my sets, as Classic Space Guy (which is how I'll refer to him moving forward) said I should bring my models to the next show in 2024.
So I ordered a few base plates, got shocked at how much people wanted to sell 16x16 plates for and begun work on a backdrop to display the various 90s space sets I have. All with the aim to display by March 2024.
However before that date came around, Classic Space Guy informed me that the local Lego club was putting on a small display at a local school. So local I could walk it, albeit it would have been a few trips. No in the end my wife drove me round the corner so I could play with Lego... I know, I know it doesn't exactly help the image of grown men collecting toys but my car has once again broken down...
Anyway, back to the point of this blog. Since November 23 and my first exhibition my display has already changed a fair bit, so I wanted to start cataloguing the change so I (and the few interested people around the globe) can refer back to in the years to come.
November 2023
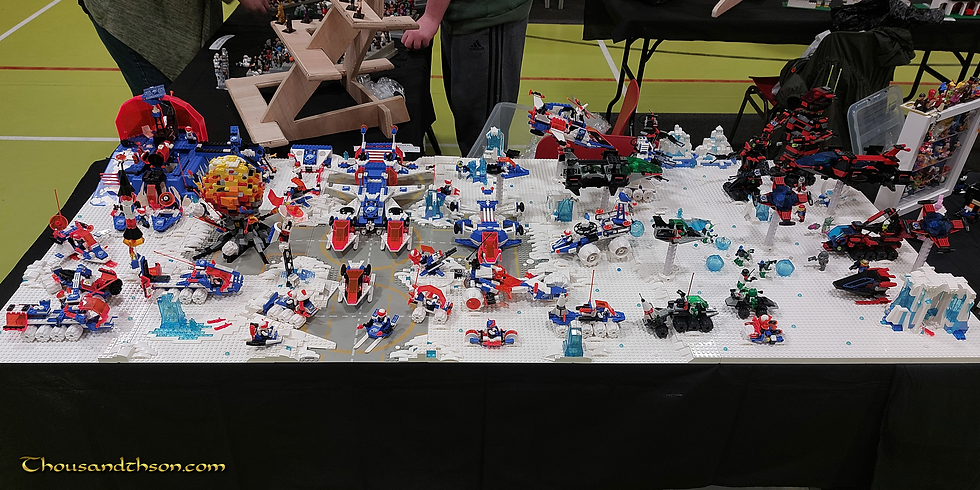
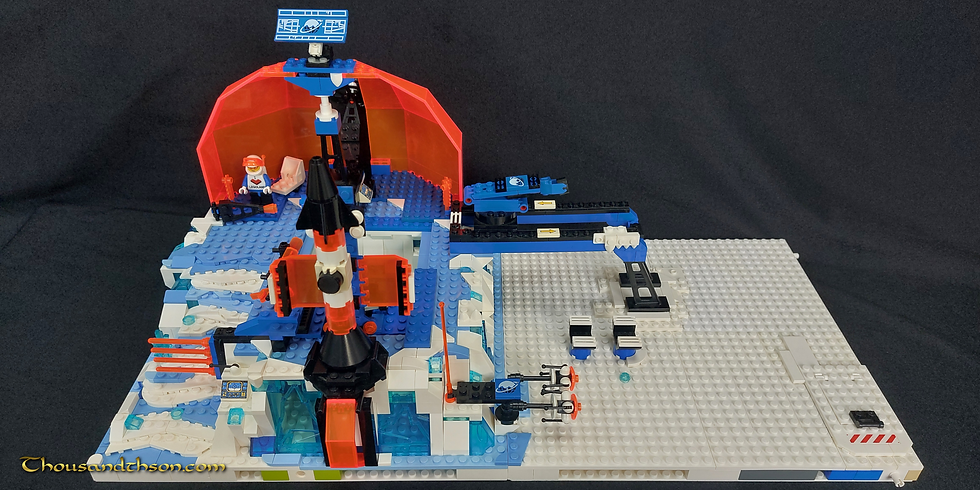
My aim was and still is (as of writing) to display a Spyrius attack on an Ice Planet base. With a few Space Police 2 thrown in for good measure.
The terrain was simple with a few ice spikes scattered around. Some might have realised this without trying to build something like this before, but those 200 pieces you ordered from Bricklink doesn't go very far once you start clicking them into place.
Anyway, here's a few more shots from the day on the very first edition of my Ice Planet MOC;


What I didn't realise either, is that these types of shows give people who display a 1x6 brick with the exhibition's name and date printed to it. When I got home I built this into the side of one of the base plates and I'll continue to add these as a form of passport stamps to the display.
Overall, footfall wasn't great and it was typically 30-somethings who stopped by to take a look. Clearly spotting something they remember as a kid, as their own kids tried dragging them away to look at all the new shiny things. It was a fun day all in all and being able to speak with like minded people was definitely a bonus for ideas and suggestions.
December 2023
The Ice Mountain. Well it wasn't much of a mountain before. Take a look above to the left of the Spyrius advance. See the "mountain"? No? Well I don't blame you, it was two rock pieces next to each other. I was happy enough with it at the start, until I put models next to it and realised just how inefficient it was to serve as a backdrop to the whole MOC.
So I set about rebuilding it with the various pieces I had been winning via random ebay listings since the November show.


The aim was to have a forward base built into the side of a large ice spike. Behind the build and under the base's floor, there's lots of yellow bricks acting as support and a gear mechanism which pushes out a cut section of the ice if you turn the wheel in the base itself.

My son had the idea to hide his Lego dino guy in this section as if he's a prehistoric find frozen in time. Until he asks for his figure back I guess.
January 2024
To summarise the January update, I think I'd have to defer to a renown poet of the 20th century. A Robert Van Winkle once stated "Ice Ice Baby". What January lacks in babies, it makes up with in the former.
First up is a rebuild of the front left of the display. I had a small icy pond made from a few trans blue tiles. This has been expanded into the very front left and that module has also been replaced with an old Aquashark base plate. I looked at the old grey crater baseplates in Classic Space Guy's display with envy. Until I remembered this style of crater plate were also produced in light blue. A few white tiles to help it blend in and it adds another aspect to the terrain.

The dark blue trans clear tiles do help blend the two plates together but not perfectly as one lot is over white, unsurprisingly. This will probably be revisited in time but an improvement in the short term.
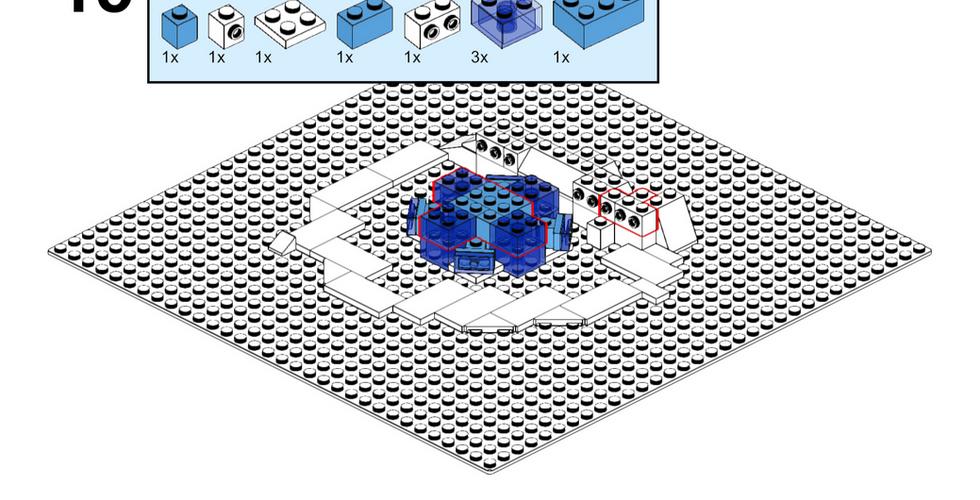
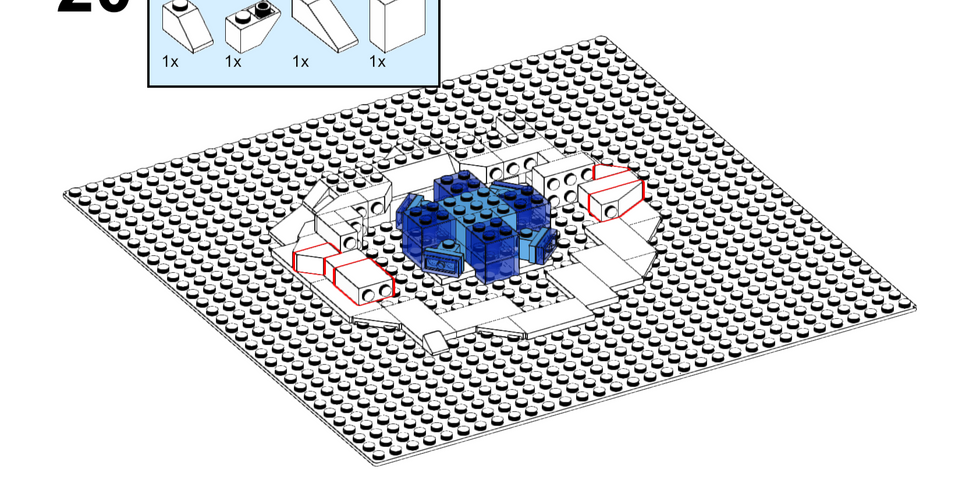
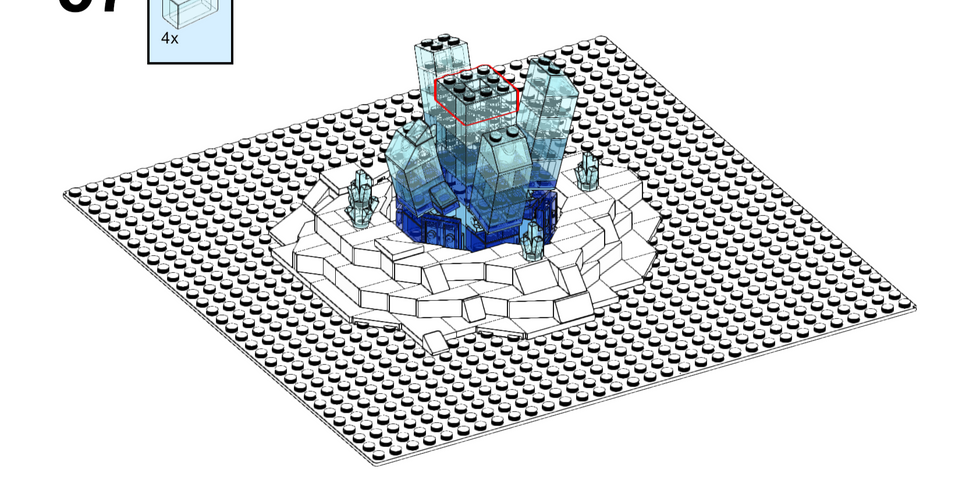
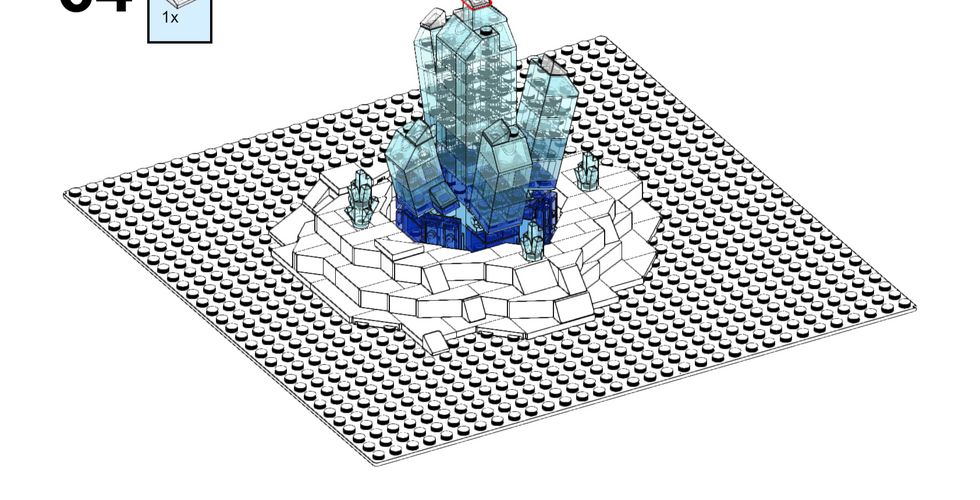
Up next is the first designed build for the terrain. As in I planned what I was building here first and didn't just smash loads of spare bricks together. I had seen something similar done in the past for a Rock Raider crystal and wanted to give it a go for the ice world.

I purposely set out to use the various shades of trans blue bricks to give it a darker gradient towards its centre.
However I still need to remove it from this baseplate and add it to the main display. Not quite sure where it's going yet.
Lastly for Jan, I've generated instructions to build this Crystal if anyone wants to follow suit. The snowy base to the crystal gets a little janky in the instructions but not impossible to follow. I think the SNOT technique (studs not on top) has thrown the algorithm which constructs these guides;


February 2024
This next addition, the upgraded runway, wasn't planned to be completed so soon. I had wanted to move away from using the classic space runway baseplates on account of them being slightly discoloured and their yellow markings. I thought about repainting them orange but in the end decided on the proper route, building them in the SNOT (studs not on top) technique.
It took me a few evenings in Studio, designing the new runway sections including the Ice Planet logo landing pad. I know a lot of builders mock this sort of stuff up physically first but I don't keep a huge spare part inventory. Studio allows me to get through all the trial and error of designing a MOC like this without having the bricks to hand. Once I'm happy with it, I can directly port it into BrickLink and order the pieces.

As for the Ice Planet logo, I first designed this in Excel by resizing all the columns and setting an Ice Planet Logo as the background image. Then it was a case of colouring each cell as if it was the side of a 1x1 plate. Once each cell was filled with a colour, I started merging the cells to make either bricks or plates.
One of the harder parts to the construction of the logo landing pad and the loading zone opposite, was the fact these flat sections are built out of multiple panels. It's a little easier to see in the loading zone below, but each different direction of the orange or white lines represent a new panel with the studs facing a different direction. In the end, the loading zone is made up from 6 different panels all joining together. Eight if you count the cargo lift presumably taking supplies below ground.
As for the number 93 on the main runway, this is a reference to 1993, the year Ice Planet sets were first released. The technical part here was reversing the direction of the studs mid panel so that two cheese wedge parts faced off against each other. I didn't need to make this more complicated but I think the numbers look better being somewhat rounded. This was achieved by using 1x1 bricks with a technic pin hole and a technic pin. It leaves a small gap but not big enough to really notice. I know this same effect can be achieved by simply leaving a gap for a cheese wedge part and pushing one into it, but I don't want any parts of my MOC not actually connected to another part, hence the redirection of the studs.
So anyway, here's the digital proof before the brick link order went in;

All that was left was putting it together, carefully checking my digital render each evening as different parcels arrived. Then, once it was complete, getting the whole display out on the kitchen table again and blending these modules into the rest. Luckily I had just enough slope pieces to do the job but I'm relying on too many discoloured white bricks for my liking.
Anyway, I'll hold off on pictures on the full display until my next exhibit. For now, here's the images of the 5 completed runway modules;


That's it for now. I have an exhibit coming up in March so that's about all I'm going to get done in time for that. The only other addition was some frozen trees and bushes but I'll wait for the show before taking photos of those.
March 2024
So this Sunday just gone (17th), I exhibited my display at the Plymouth Brick Festival. For this part of the UK, it's arguably the biggest locally.
Turn out was great and I was lucky enough to have crowds of people around the display most of the day. I also created a little can you spot list which helped keep the crowds at my stand a little longer. Overall, really enjoyed the day and manged to come home with a couple of Ice Planet figures recued from a trader. Not that the trader mistreated the tiny plastic figures, but they had mismatched hands and legs etc. Something cathartic about restoring Lego figs back to their original state.
Anyway, here are some pictures from the day;


June 2024
This month saw the first National Brick Events show all the way down here in Plymouth and I have to say, I thoroughly enjoyed it. The show organisers are very friendly and are keen to come back to Plymouth next year too!
All in all, there were 4-5 manned displays, maybe about twice that for MOCs the NDE crew had brought with them and a fair range of traders.
I think they had hoped for more local traders volunteering and I know after speaking to a few locally, people had a wait a see attitude on this first NBE show. I take a slightly different view, turn up, show your work, make it good enough so they'll be a second show.
Turn out from the public was good, but the event organisers told us the recent debacle at the Birmingham NEC and Brick Fest Live might have put some people off buying tickets. Not that these two shows are in anyway linked, being a different location and most importantly, a different company putting on the show, but we all reckoned the NEC show left a bad taste in a few people's mouths as it got national coverage.
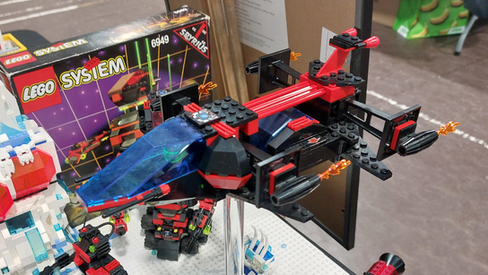
Anyway, this was my fist time displaying my 4x7 baseplate Ice Planet base and even managed to finish off my Spyrius Stealth Tank MOC in time too.


and because pictures aren't always enough, here's a really simple video taken on the day.
There is one final photo from the day, and it's myself looking like a total dork! Not sure what the Ice Planeteers are thinking. You can't see anything through Trans Neon Orange!

July 2024
So like a lot of the things I've built so far, the following wasn't really planned. Well before a few bricks came into my possession and got the old grey matter ticking over.
Following displaying at the National Brick Events show in Plymouth the other month, the show organisers reached out to me with a proverbial treasure trove of Trans Neon Orange pieces. This, amongst other things, brought my collection of TNO garage door pieces to a level I could actually make a full garage door.
I started thinking about making a garage lock up, but then combined with some of the window pieces, my mind started forming a house and I thought, that would work. All these Ice Planet colonists need somewhere to live. Maybe the colony airdrops in premade structures.
The following build also gave me an excuse to make interior detail. Something so far I've been wanting to do but didn't have an idea on how to execute it for Lego Space outside of a huge spaceship interior. Like may AFOL, I've watched a fair few videos on massive Lego City MOCs and have been looking for a reason to give this ago myself.
So anyway, here's my Ice Planet colony hab unit. I've already worked out where to include it within the display and it has also forced me into sorting out proper flying stands. I can free up a lot of ground space by getting the aircraft higher up than they have been. More on those flying stands later.

With the interior colour palette, I've kept to the same blue, black and orange for the overall theme, but allowed myself to add hue and shade variance. Really just to break up the monotony of the colours used so far and give myself a greater pool of bricks to build from.
I can't say it's finished. I'll be looking to continue to update it. For example the rear blue upright details are 1x8 plates, but i'd prefer 1x8 tiles. I'd also like to include more black pieces on the exterior but I've been working with what I have to hand so far.


That's all for the update so far. The next show is at the end of this month, so i'll have more images to share then.
Okehampton 2 - 2024, PlymLUG Bricktackular
At the end of July, the 27th to be precise, I took my display to the 2nd show put on in Okehampton by the local LUG (Lego Users Group), with the first show being the year previous.
There where plenty of really detailed displays in attendance, some of which I've featured on the video below;
This was also the first show in which I brought purpose built flying stands for some of my vehicles. For those interested, I used clear Acrylic piping with an outer dimension of 16mm. That way, the tubes fit nicely between 4 macaroni pieces. Not going to lie however, the Lego bricks have been glued to this clear tubes. I'm not taking any risks with kids potentially jogging a table and sending my models literally flying.
You can see a few of these flying stands supporting the X-bow, Spyrius Rebel Hunter and recoloured Ice Planet Particle Ioniser.


I think for the next show, I'll aim to swap out the Spyrius antagonists with my UFO collection. So I've got a couple of months to get all of those sorted and ready.
22nd of September 2024 - Plymouth Brick Festival
16th of March 2025 - Plymouth Brick Festival
Here we are—first show of the year! My display hasn’t changed much since the last one, as I’ve been primarily focused on Warhammer over the past few months.
That said, I did redesign my Yeti Cave, though mostly for transportation reasons. The new version (pictured below) can be taken apart, which makes packing up at the end of a show a bit more flexible. No matter how hard I try, I can never seem to pack things the same way twice! Another box would help with space—though that just means needing a bigger car...


It was also the first show I properly brought my CnC Red Alert mini MOCs to. Not many people noticed them, but the ones who did made up for it.


15th of August 2025
I haven’t posted in a while, not because I’ve been idle, but quite the opposite. Most of my time has gone into preparing for the Manchester show next February, plotting ways to raise the bar for Ice Station Odyssey. The biggest milestone? Adding my first motorised section and retiring the old moulded baseplate.
The motorised section is an icy waterfall made from a cascade of garage door panels, driven at the top by old Technic rubber wheels. At the bottom, free-spinning plastic wheels help keep the “water” aligned and in shape. The whole module is built with maintenance in mind: the top sections lift away, and the front swings open like a door so I can get at the gears and moving parts. It’s a bit noisy in my kitchen, but at a show, surrounded by the hum and chatter, it’ll blend right in.
The second big change is replacing the original vacuum-formed baseplate with a fully brick-built version. The old one has served faithfully, but it’s showing its age. Discoloured, cracked, and a little too out of step with the rest of my display. Now, the whole layout sits on a consistent brick-and-plate foundation, making Ice Station Odyssey feel more integrated and giving it the attention it deserves in the Ice Plant display.
I've also decided to include far more of the Medium Blue and Bright Light Blue bricks in the overall display. They're really nice shades and will allow me to include blue terrain pieces without it looking like the ice is the same shade of blue all the vehicles are painted.


I’ve also made plenty of smaller tweaks since my last major post, but those will wait for another day. I’ve got a local show next weekend, and after that I plan to finally do some proper filming and video editing to show everything in action.


Comments